材质编译
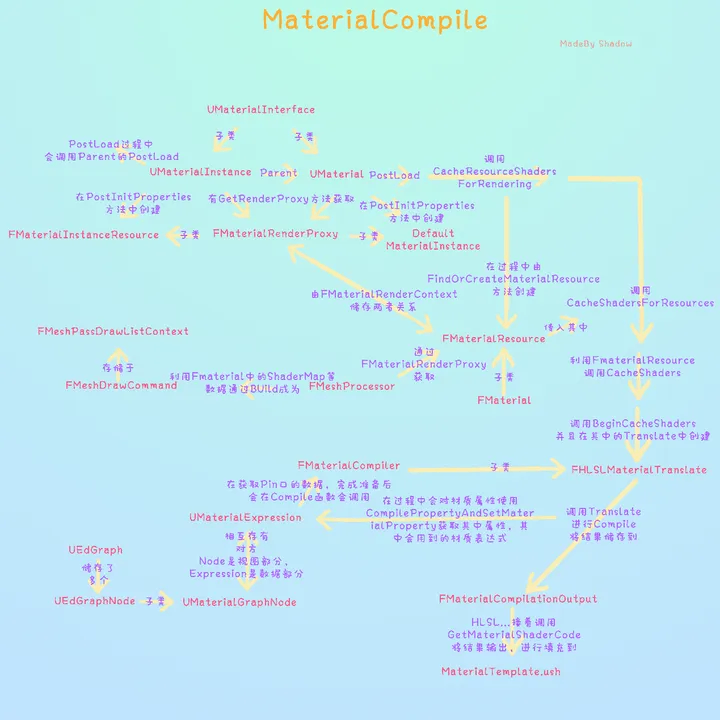 关于UE的整个材质系统运行流程可以参考此文章。
材质节点编译全流程
首先介绍一下会涉及到的几个类,让大家有个初步印象。
- FMaterialCompiler。用来对材质节点进行编译生成HLSL代码的基类,在UE的材质节点中,通常使用其子类FHLSLMaterialTranslator进行编译。
- UMaterialExpression。表达式基类,定义了表达式的作用。
- FExpressionInput。大部分表达式需要有输入参数,这个类就代表了输入参数。
材质节点系统生成HLSL代码的过程确实类似于一个编译器编译的过程,下面对生成代码过程的讲解会向编译器的方向靠拢。 为了方便起见,以下都用最简单的Add节点为例。
表达式输入-->Operand
Add节点包含两个输入,节点输入的实际类型是FExpressionInput。 FExpressionInput类型包含了与其直接相连的上游节点的UMaterialExpression和输出pin的index信息,因此其最重要的Compile函数会在有上游节点的情况下,会调用FMaterialCompiler类的CallExpression函数,以获取到上游节点的结果。 下面在讲解FMaterialCompiler的部分会更加详细地讲解CallExpression函数的执行过程。
表达式-->Operator
UMaterialExpression是节点表达式类,此类包含了输入的信息FExpressionInput,并通过重载Compile函数来自定义“运算”。
上图中*.Compile()进行的“运算”是调用了FMaterialCompiler类中提供的函数进行“运算”,例如一个Add节点就是调用了FMaterialCompiler::Add()函数。 之所以给“运算”打上引号,是因为这些运算函数并不会进行实际的运算,FMaterialCompiler::Add()等函数会将此运算生成实际的HLSL代码,例如Add运算的代码即为"(%s + %s)"。
编译器-->Compiler
插入代码片段 AddCodeChunk
上面说到,一个Add表达式是调用了FMaterialCompiler.Add()函数生成了HLSL代码"(%s + %s)",这代码片段需要插入到整个材质的HLSL代码中才能,。 翻译材质节点时,使用FMaterialCompiler的子类FHLSLMaterialTranslator进行编译,因此实际上是调用的FHLSLMaterialTranslator::Add()函数,这个函数会调用FHLSLMaterialTranslator::AddCodeChunkInner()函数,将代码片段(Code Chunk)"(A + B)"加入到TArray<FShaderCodeChunk>类型的FHLSLMaterialTranslator::CurrentScopeChunks成员中。 代码片段有inline和非inline的插入方式,inline方式就直接在目前代码片段末尾插入,非inline方式则需要另起一行并分配一个中间变量保存计算结果。下面是非inline方式生成代码的代码,看着有点难绷。 甚至缩进都是手打的(。
// Allocate a local variable name
const FString SymbolName = CreateSymbolName(TEXT("Local"));
// Construct the definition string which stores the result in a temporary and adds a newline for readability
const FString LocalVariableDefinition = FString("   ") + HLSLTypeString(Type) + TEXT(" ") + SymbolName + TEXT(" = ") + FormattedCode + TEXT(";") + LINE_TERMINATOR;
值得一提的是,加减乘除等基础运算都是非inline的插入方式,推测是因为要处理运算符的优先级和括号匹配比较麻烦,因此就直接单独处理了;Component Mask则是典型的inline。 此函数返回的是插入代码片段的index,可以通过这个index访问FHLSLMaterialTranslator::TArray<FShaderCodeChun>* CurrentScopeChunks
编译上游表达式 CallExpression
前面说到,表达式输入FExpressionInput的Compile函数会调用编译器的CallExpression函数,获取到其直接上游节点的结果,这部分就来详细说明这一过程。
上面的图表是简化后的过程,实际上还会检查是否被重入。 整个材质编译过程还是比较简单清晰的。
编译流程
HLSLMaterialTranslator使用FHLSLMaterialTranslator::Translate()函数将材质节点生成HLSL代码。 UE4会将材质编译成HLSL代码,其实可以在材质编辑器的window->Shader Code->HLSL Code查看。
CustomOutputs
CustomOutputs我感觉就相当于自定义的Shading Model的材质节点,例如UMaterialExpressionClearCoatNormalCustomOutput就是清漆材质的自定义Shading Model。因此如果想要自定义一个Shading Model,则需要创建一个继承自UMaterialExpressionCustomOutput的类。此文章有详细讲解如何创建一个自定义的ToonShading。 在材质翻译过程中,会收集材质所使用到的CustomOutput然后先编译好。
编译法线
Translator首先会将法线进行变换,以下是源码中的一段注释,因为PixelNormal有可能会被其他节点用到,例如我想沿法线进行WPO,所以需要我们在Shader一开始先进行法线的计算。
// Generate code:
// Normally one would expect the generator to emit something like
//     float Local0 = ...
//     ...
//     float Local3= ...
//     ...
//     float Localn= ...
//     PixelMaterialInputs.EmissiveColor = Local0 + ...
//     PixelMaterialInputs.Normal = Local3 * ...
// However because the Normal can be used in the middle of generating other Locals (which happens when using a node like PixelNormalWS)
// instead we generate this:
//     float Local0 = ...
//     ...
//     float Local3= ...
//     PixelMaterialInputs.Normal = Local3 * ...
//     ...
//     float Localn= ...
//     PixelMaterialInputs.EmissiveColor = Local0 + ...
// in other words, compile Normal first, then emit all the expressions up to the last one Normal requires;
// assign the normal into the shared struct, then emit the remaining expressions; finally assign the rest of the shared struct inputs.
// Inputs that are not shared, have false in the SharedPixelProperties array, and those ones will emit the full code.
使用如下代码先对法线属性进行编译。
Chunk[MP_Normal] = Material->CompilePropertyAndSetMaterialProperty(MP_Normal,this);
CompilePropertyAndSetMaterialProperty这个函数是FMaterial的一个成员函数,用于编译材质的输入属性。然而实际上CompilePropertyAndSetMaterialProperty函数会先调用编译器的SetMaterialProperty函数以设置编译器的当前ShaderFrequency,ShaderFrequency相当于着色器阶段,包含顶点、计算、像素、几何等着色器。 然后调用UMaterialInterface::CompileProperty,因为UMaterial是继承自UMaterialInterface,因此实际上是调用了UMaterial::CompileProperty。 我们看看UMaterial::CompileProperty的实现代码:
int32 UMaterial::CompilePropertyEx( FMaterialCompiler* Compiler, const FGuid& AttributeID )
{
    const EMaterialProperty Property = FMaterialAttributeDefinitionMap::GetProperty(AttributeID);

    if( bUseMaterialAttributes && MP_DiffuseColor != Property && MP_SpecularColor != Property )
    {       return MaterialAttributes.CompileWithDefault(Compiler, AttributeID);
    }
    switch (Property)
    {       case MP_Opacity:            return Opacity.CompileWithDefault(Compiler, Property);
       case MP_OpacityMask:         return OpacityMask.CompileWithDefault(Compiler, Property);
       case MP_Metallic:           return Metallic.CompileWithDefault(Compiler, Property);
       case MP_Specular:           return Specular.CompileWithDefault(Compiler, Property);
       ...
       default:
          if (Property >= MP_CustomizedUVs0 && Property <= MP_CustomizedUVs7)
          {             const int32 TextureCoordinateIndex = Property - MP_CustomizedUVs0;

             if (CustomizedUVs[TextureCoordinateIndex].Expression && TextureCoordinateIndex < NumCustomizedUVs)
             {                return CustomizedUVs[TextureCoordinateIndex].CompileWithDefault(Compiler, Property);
             }             else
             {
                // The user did not customize this UV, pass through the vertex texture coordinates
                return Compiler->TextureCoordinate(TextureCoordinateIndex, false, false);
             }          }           }

    check(0);
    return INDEX_NONE;
}
可以看到,基本是通过调用FScalarMaterialInput、FColorMaterialInput、FVectorMaterialInput等的CompileWithDefault函数进行的——这些类都是FMaterialInput的模板特化,而FMaterialInput又继承自FExpressionInput,可以说是带模板参数的FExpressionInput,因此和前文提到的FExpressionInput行为一致。CompileWithDefault函数会将属性编译为常量或者调用其FExpressionInput::Compile()函数。读者应该记得,前文说到FExpressionInput::Compile()函数会对其直接上游节点调用CallExpression函数来进行编译,因此这里对法线属性进行CompilePropertyAndSetMaterialProperty就相当于把连接到法线属性的所有节点都进行编译,逻辑闭环了这下。 最后的编译结果返回的是对应属性的Code Index,保存在Chunk[]中。
编译其他材质属性
按照如下顺序来编译其他属性:
Chunk[MP_EmissiveColor]             = Material->CompilePropertyAndSetMaterialProperty(MP_EmissiveColor       ,this);
Chunk[MP_DiffuseColor]              = Material->CompilePropertyAndSetMaterialProperty(MP_DiffuseColor        ,this);
Chunk[MP_SpecularColor]             = Material->CompilePropertyAndSetMaterialProperty(MP_SpecularColor       ,this);
Chunk[MP_BaseColor]                = Material->CompilePropertyAndSetMaterialProperty(MP_BaseColor          ,this);
Chunk[MP_Metallic]                 = Material->CompilePropertyAndSetMaterialProperty(MP_Metallic           ,this);
Chunk[MP_Specular]                 = Material->CompilePropertyAndSetMaterialProperty(MP_Specular           ,this);
Chunk[MP_Roughness]                = Material->CompilePropertyAndSetMaterialProperty(MP_Roughness          ,this);
Chunk[MP_Anisotropy]                = Material->CompilePropertyAndSetMaterialProperty(MP_Anisotropy             ,this);
Chunk[MP_Opacity]                  = Material->CompilePropertyAndSetMaterialProperty(MP_Opacity            ,this);
Chunk[MP_OpacityMask]               = Material->CompilePropertyAndSetMaterialProperty(MP_OpacityMask         ,this);
Chunk[MP_Tangent]                  = Material->CompilePropertyAndSetMaterialProperty(MP_Tangent            ,this);
Chunk[MP_WorldPositionOffset]         = Material->CompilePropertyAndSetMaterialProperty(MP_WorldPositionOffset   ,this);
Chunk[MP_WorldDisplacement]          = Material->CompilePropertyAndSetMaterialProperty(MP_WorldDisplacement    ,this);
Chunk[MP_TessellationMultiplier]       = Material->CompilePropertyAndSetMaterialProperty(MP_TessellationMultiplier    ,this);
执行完后再编译ShadingModel。
Chunk[MP_ShadingModel] = Material->CompilePropertyAndSetMaterialProperty(MP_ShadingModel ,this);
然后FMaterialShadingModelField MaterialShadingModels = Material->GetShadingModels(); 看代码说,材质的ShadingModel还可以来自材质表达式,如果有材质表达式包含了ShadingModel那么就会使用此ShadingModel。但是没太懂这是个什么情况。
之后在Volume域下,或者在Surface域&&ShadingModel是SSS时会进行SSS属性的编译。
int32 SubsurfaceColor = Material->CompilePropertyAndSetMaterialProperty(MP_SubsurfaceColor, this);
...
Chunk[MP_SubsurfaceColor] = AppendVector(SubsurfaceColor, CodeSubsurfaceProfile);
然后编译CustomData和AO。
Chunk[MP_CustomData0]               = Material->CompilePropertyAndSetMaterialProperty(MP_CustomData0      ,this);
Chunk[MP_CustomData1]               = Material->CompilePropertyAndSetMaterialProperty(MP_CustomData1      ,this);
Chunk[MP_AmbientOcclusion]           = Material->CompilePropertyAndSetMaterialProperty(MP_AmbientOcclusion  ,this);
然后在BlendMode是Translucent或ShadingModel包含SingleLayerWater的时候会编译Refraction。Refraction的值是直接把材质属性中的Refraction和RefractionDepthBias进行append。
if (IsTranslucentBlendMode(BlendMode) || MaterialShadingModels.HasShadingModel(MSM_SingleLayerWater))
{
    int32 UserRefraction = ForceCast(Material->CompilePropertyAndSetMaterialProperty(MP_Refraction, this), MCT_Float1);
    int32 RefractionDepthBias = ForceCast(ScalarParameter(FName(TEXT("RefractionDepthBias")), Material->GetRefractionDepthBiasValue()), MCT_Float1);

    Chunk[MP_Refraction] = AppendVector(UserRefraction, RefractionDepthBias);
}
然后是WPO和PixelDepthOffset。在此之前已经编译过一次WPO了,不知道这里编译的Previous WPO是啥。
if (Chunk[MP_WorldPositionOffset] != INDEX_NONE)
{
    // Only calculate previous WPO if there is a current WPO
    Chunk[CompiledMP_PrevWorldPositionOffset] = Material->CompilePropertyAndSetMaterialProperty(MP_WorldPositionOffset, this, SF_Vertex, true);
}

Chunk[MP_PixelDepthOffset] = Material->CompilePropertyAndSetMaterialProperty(MP_PixelDepthOffset, this);
编译CustomOutputs
没搞懂为啥又编一次,略过。
{
    CompileCustomOutputs(CustomOutputExpressions, SeenCustomOutputExpressionsClasses, false);
}
至此完成了PixelShader的编译。
收集用到的UV数
会调用FHLSLMaterialTranslator::GetNumUserTexCoords()收集使用到的TexCoord的套数,这里的TexCoord指的是Vertex To Pixel的结构体所使用到的TexCoord套数——很多需要在Vertex Shader读取,插值后传到Pixel Shader的数据都要存在TexCoord里。
for (uint32 CustomUVIndex = MP_CustomizedUVs0; CustomUVIndex <= MP_CustomizedUVs7; CustomUVIndex++)
{
    // Only compile custom UV inputs for UV channels requested by the pixel shader inputs
    // Any unconnected inputs will have a texcoord generated for them in Material->CompileProperty, which will pass through the vertex (uncustomized) texture coordinates    // Note: this is using NumUserTexCoords, which is set by translating all the pixel properties above    if (CustomUVIndex - MP_CustomizedUVs0 < SavedNumUserTexCoords)
    {       Chunk[CustomUVIndex] = Material->CompilePropertyAndSetMaterialProperty((EMaterialProperty)CustomUVIndex, this);
    }}
而FHLSLMaterialTranslator::GetNumUserVertexTexCoords()会收集Vertex Shader用到的模型输入的TexCoord套数。
编译CustomExpression实现
在调用之前先实现自定义的Expression,应该是包含了Custom Node以及一些常用函数。
// Output the implementation for any custom expressions we will call below.
for (int32 ExpressionIndex = 0; ExpressionIndex < CustomExpressions.Num(); ExpressionIndex++)
{
    ResourcesString += CustomExpressions[ExpressionIndex].Implementation + "\r\n\r\n";
}
至此代码片段的生成已经结束。
检查错误
然后会进行一堆诸如"Dynamically lit translucency is not supported for BLEND_Modulate materials."、"Only transparent or postprocess materials can read from scene depth."之类的检查。
顶点插值
顶点上的属性都可以用VertexInterpolator节点插值,然后在PixelShader中进行读取,例如说我们想在PixelShader中使用PerInstance Custom Data,那么需要将其连到VertexInterpolator节点后进行使用。因此UE4首先会将当前材质以及当前材质引用到的材质函数中使用到VertexInterpolator的节点先进行计算和插值。 编译器使用如下代码生成代码并检查是否超过插值数量的最大限制。下面的代码限制了所有V2P的参数大小不能超过8(套Texcoord)×2(每套TexCoord有两个Scalar元素)。
FString InterpolatorsOffsetsDefinitionCode;
TBitArray<> FinalAllocatedCoords = GetVertexInterpolatorsOffsets(InterpolatorsOffsetsDefinitionCode);

// Finished compilation, verify final interpolator count restrictions
if (CurrentCustomVertexInterpolatorOffset > 0)
{
    const int32 MaxNumScalars = 8 * 2;
    const int32 TotalUsedScalars = FinalAllocatedCoords.FindLast(true) + 1;

       if (TotalUsedScalars > MaxNumScalars)
    {       Errorf(TEXT("Maximum number of custom vertex interpolators exceeded. (%i / %i scalar values) (TexCoord: %i scalars, Custom: %i scalars)"),
          TotalUsedScalars, MaxNumScalars, GetNumUserTexCoords() * 2, CurrentCustomVertexInterpolatorOffset);
    }}
其中FHLSLMaterialTranslator::GetVertexInterpolatorsOffsets()传入一个字符串引用,用于写入生成的HLSL代码。 生成HLSL代码部分的代码如下:
for (UMaterialExpressionVertexInterpolator* Interpolator : SortedInterpolators)
{
    int32 Index = Interpolator->InterpolatorIndex;

    const EMaterialValueType Type = Interpolator->InterpolatedType == MCT_Float ? MCT_Float1 : Interpolator->InterpolatedType;

    VertexInterpolatorsOffsetsDefinitionCode += LINE_TERMINATOR;
    VertexInterpolatorsOffsetsDefinitionCode += FString::Printf(TEXT("#define VERTEX_INTERPOLATOR_%i_TEXCOORDS_X\t%i") LINE_TERMINATOR, Index, GetNextUVSlot());

    if (Type >= MCT_Float2)
    {       VertexInterpolatorsOffsetsDefinitionCode += FString::Printf(TEXT("#define VERTEX_INTERPOLATOR_%i_TEXCOORDS_Y\t%i") LINE_TERMINATOR, Index, GetNextUVSlot());

       if (Type >= MCT_Float3)
       {          VertexInterpolatorsOffsetsDefinitionCode += FString::Printf(TEXT("#define VERTEX_INTERPOLATOR_%i_TEXCOORDS_Z\t%i") LINE_TERMINATOR, Index, GetNextUVSlot());

          if (Type == MCT_Float4)
          {             VertexInterpolatorsOffsetsDefinitionCode += FString::Printf(TEXT("#define VERTEX_INTERPOLATOR_%i_TEXCOORDS_W\t%i") LINE_TERMINATOR, Index, GetNextUVSlot());
          }       }    }       VertexInterpolatorsOffsetsDefinitionCode += LINE_TERMINATOR;
}
写法还挺有趣。
“拼接”代码
前面生成了各种各样的“代码片段(Code Chunk)”,接下来要将其按照一定顺序拼接起来。 拼接代码主要使用FHLSLMaterialTranslator::GetFixedParameterCode()函数。FHLSLMaterialTranslator::GetFixedParameterCode()会根据传进来的对应的代码索引和索引范围,输出实际的HLSL代码。
void FHLSLMaterialTranslator::GetFixedParameterCode(int32 StartChunk, int32 EndChunk, int32 ResultIndex, TArray<FShaderCodeChunk>& CodeChunks, FString& OutDefinitions, FString& OutValue)
{
    if (ResultIndex != INDEX_NONE)
    {       checkf(ResultIndex >= 0 && ResultIndex < CodeChunks.Num(), TEXT("Index out of range %d/%d [%s]"), ResultIndex, CodeChunks.Num(), *Material->GetFriendlyName());
       check(!CodeChunks[ResultIndex].UniformExpression || CodeChunks[ResultIndex].UniformExpression->IsConstant());
       if (CodeChunks[ResultIndex].UniformExpression && CodeChunks[ResultIndex].UniformExpression->IsConstant())
       {          // Handle a constant uniform expression being the only code chunk hooked up to a material input
          const FShaderCodeChunk& ResultChunk = CodeChunks[ResultIndex];
          OutValue = ResultChunk.Definition;
       }       else
       {
          const FShaderCodeChunk& ResultChunk = CodeChunks[ResultIndex];
          // Combine the definition lines and the return statement
          check(ResultChunk.bInline || ResultChunk.SymbolName.Len() > 0);
          OutDefinitions = GetDefinitions(CodeChunks, StartChunk, EndChunk);
          OutValue = ResultChunk.bInline ? ResultChunk.Definition : ResultChunk.SymbolName;
       }    }    else
    {
       OutValue = TEXT("0");
    }}
具体来说,如果输入的代码索引对应的代码是常量表达式,盲猜是例如Normal=float3(0, 0, 0),那么就直接返回这个常量表达式。 否则就说明其包含了多个计算步骤,那么就会使用GetDefinitions(CodeChunks, StartChunk, EndChunk);逐个写入每个代码片段。
法线
GetFixedParameterCode(
    0,
    NormalCodeChunkEnd,    Chunk[MP_Normal],
    SharedPropertyCodeChunks[NormalShaderFrequency],
    TranslatedCodeChunkDefinitions[MP_Normal],
    TranslatedCodeChunks[MP_Normal]);

// Always gather MP_Normal definitions as they can be shared by other properties
if (TranslatedCodeChunkDefinitions[MP_Normal].IsEmpty())
{
    TranslatedCodeChunkDefinitions[MP_Normal] = GetDefinitions(SharedPropertyCodeChunks[NormalShaderFrequency], 0, NormalCodeChunkEnd);
}
其他属性
其他属性就直接for循环遍历插入了。
// Now the rest, skipping Normal
for(uint32 PropertyId = 0; PropertyId < MP_MAX; ++PropertyId)
{
    if (PropertyId == MP_MaterialAttributes || PropertyId == MP_Normal || PropertyId == MP_CustomOutput)
    {       continue;
    }
    const EShaderFrequency PropertyShaderFrequency = FMaterialAttributeDefinitionMap::GetShaderFrequency((EMaterialProperty)PropertyId);

    int32 StartChunk = 0;
    if (PropertyShaderFrequency == NormalShaderFrequency && SharedPixelProperties[PropertyId])
    {       // When processing shared properties, do not generate the code before the Normal was generated as those are already handled
       StartChunk = NormalCodeChunkEnd;
    }
    GetFixedParameterCode(
       StartChunk,       SharedPropertyCodeChunks[PropertyShaderFrequency].Num(),
       Chunk[PropertyId],       SharedPropertyCodeChunks[PropertyShaderFrequency],
       TranslatedCodeChunkDefinitions[PropertyId],
       TranslatedCodeChunks[PropertyId]);
}
其他还进行了一些感觉很无聊的操作不想看。
生成HLSL代码
上述过程实际上只收集了生成代码所需的必要信息,而实际的代码生成是在FHLSLMaterialTranslator::GetMaterialShaderCode()。 实际上HLSL代码是基于一个代码模板来生成的,模板在/Engine/Shaders/Private/MaterialTemplate.ush。模板里面有复数个"%s"。
TexCoord数量
Shader中需要显示声明VertexShader和PixelShader使用到的TexCoord数。另外还声明了VertexInterpolator的数量。VertexInterpolator的数据是保存在,传递到PixelShader的FMaterialPixelParameters结构体内的。
const uint32 NumUserVertexTexCoords = GetNumUserVertexTexCoords();
const uint32 NumUserTexCoords = GetNumUserTexCoords();
const uint32 NumCustomVectors = FMath::DivideAndRoundUp((uint32)CurrentCustomVertexInterpolatorOffset, 2u);
const uint32 NumTexCoordVectors = FinalAllocatedCoords.FindLast(true) + 1;

LazyPrintf.PushParam(*FString::Printf(TEXT("%u"),NumUserVertexTexCoords));
LazyPrintf.PushParam(*FString::Printf(TEXT("%u"),NumUserTexCoords));
LazyPrintf.PushParam(*FString::Printf(TEXT("%u"),NumCustomVectors));
LazyPrintf.PushParam(*FString::Printf(TEXT("%u"),NumTexCoordVectors));

LazyPrintf.PushParam(*VertexInterpolatorsOffsetsDefinition);
FMaterialAttributes
FMaterialAttributes结构体。但是目前没发现在哪里用到过这个结构体。
FPixelMaterialInputs
接下来生成FPixelMaterialInputs结构体的成员。使用GetSharedInputsMaterialCode函数生成代码。 FPixelMaterialInputs结构体是PixelShader的输入(输出)参数,